понедельник, 27 июня 2016 г.

The Only 5 Stretches You Need

The Only 5 Stretches You Need

Why You Should Stretch


1 of 6


All photos


As a fitness professional and athlete, one of the most common questions I hear is, "Do I really need to stretch?" or "What's the least amount of stretching I can do to still be worth it?" The short answer: Yes, stretching is important, and you should spend at least five minutes cooling down after every workout. Here are a few reasons why:


1. You'll prevent injury and relieve pain. Stretching increases your range of motion, taking pressure off the joints and allowing the body to move more fluidly during exercise. As a result, you'll help prevent injury and/or pain that can be the product of an active lifestyle.


2. You'll improve circulation. Stretching improves circulation by increasing blood flow to your muscles. Better circulation helps the body recover faster by removing waste byproducts in muscle tissue.


3. You'll relieve stress. Stretching also helps calm the mind and reduce stress levels. When you're anxious, worried, or worn out, it places extra strain on the body, causing you to feel stressed. By taking a few minutes each day to unwind and relieve this unwanted tension, you will experience a sense of relief and stress will slowly start to fade away.


Do this 5-minute cool-down at the end of your workout, when you wake up, or before you go to bed. Hold each stretch for 30 seconds, and repeat all five stretches 2-3 times.


Shop All Exercise Mats


Downward Dog


2 of 6


All photos


Benefits:


  • Improves flexibility in calves, hamstrings, and shoulders
  • Relieves pain in the low back
  • Elongates cervical spine, which relieves tension in the body and head

How to do it: Come onto your hands and knees with hands directly below your shoulders and knees directly below your hips. Spread your fingers wide and tuck your toes under. Inhale and lift your knees off the floor, pressing your hips up toward the ceiling. Draw your heels down to the floor or keep a slight bend in your knees. Press your hands firmly into the mat and draw your shoulder blades down. Keep the head between the arms (don't let it hang). Take deep breaths the entire time.


Low Lunge


3 of 6


All photos


Benefits:


  • Improves flexibility in hips and quadriceps
  • Releases the psoas, which is part of a group of muscles called the hip flexors. Tightness of the psoas can result in lower back pain by compressing the lumbar discs

How to do it: Come onto both knees and step your right foot forward. Make sure to keep your right knee over your heel and your left knee directly under your hip. Reach your left hand up toward the ceiling. Make sure to keep both hips facing forward and glutes engaged. Take deep breaths the entire time.


Lying Piriformis Stretch


4 of 6


All photos


Benefits:


  • Improves flexibility in hips and glutes
  • Helps keep hip and knee joints properly aligned during activity and helps prevent sudden twisting
  • Allows for easy external rotation of the hips

How to do it: Lie on your back, bend both knees, and bring your left ankle over your right thigh. Lift your right foot off the ground, bringing your leg up to a 90-degree angle. Loop your hands in between your legs and slowly draw your right knee in toward your chest. Keep your head and neck relaxed on the ground. Take deep breaths the entire time.


Original article and pictures take www.shape.com site

среда, 15 июня 2016 г.

The New Rules of Foam Rolling

The New Rules of Foam Rolling
foam rolling, foam roller, workout, tips, rules,

Now that you've adopted the habit, familiarize yourself with the updated approach.


Foam rolling has become a widely-practiced activity—and that’s a good thing. But according to Tier 4 Coach Susan Stanley, despite the growing legions of fans, there's a need for mindfulness. It's actually a more nuanced technique than one might think. Some fans warm up using techniques that are best saved for post-workout roll-outs (or avoided altogether); others neglect to mix up their approach and thus risk a foam-rolling plateau of sorts. Here are the four most common mistakes and Stanley’s tips to correct them.


  • If the roller you’re currently using is pliant and has a smooth surface, you’ve got the wrong tool for the job. “The objective of pre-workout rolling is to stimulate nerve endings in the muscles in a way that sends a rich proprioceptive message to the brain,” says Stanley. The richer that message is, the better it will prepare your brain to control your body’s movements in the subsequent workout. Firmer rollers with a textured surface (such as the Trigger Point Grid) stimulate the nerve endings more effectively and reach deeper into the muscle’s myofascial layers than do the soft, smooth products most people use. These textured rollers also provide a superior post-workout roll.

  • Slow movements are fine when you are using a roller to relax the muscles after a workout, but a faster, more vigorous technique is better in a warm-up. “Remember, you’re trying to wake up your neuromuscular system, not put it to sleep,” Stanley cautions.

  • If you’re like most athletes, you move only in the direction of your muscle fibers. Stanley teaches clients to also roll across the “grain”—a technique known as cross-fiber friction—to add another dimension to that proprioceptive message to the brain. “Also,” says Stanley, “using different speeds and techniques like pivoting and pin-and-stretching the muscle and fascia can be much more effective than just rolling over the skin.” Althought these methods are typically done with a ball, you can incorporate them into your rolling routine, as well. In the pin and stretch, you 'pin' the tissue on the roller, then move the limb to stretch the tissue that's being pinned. Pivoting is a way to drive the roller a little deeper, engaging more layers of muscle and fascia, Stanley says. This is achieved by rocking (not rolling) the edge of the roller back and forth on the target spot, or twisting, like turning a faucet on and off, on that spot.

  • Admit it: When you roll, you look for painful spots in your muscles and sort of “hang out” on them, trying to get them to relax. But according to Stanley, it’s best to save this kind of therapeutic self-torture for post-workout rolling. “Pain causes the brain to respond with a protective reflex that reduces muscle performance,” Stanley explains. In other words: Less pain, more gain!


Original article and pictures take furthermore.equinox.com site

четверг, 9 июня 2016 г.

The Lazy Girls Lower Ab Workout

The Lazy Girls Lower Ab Workout

REAL TALK GUYS.


The Lazy Girls Lower Ab Workout: Perfect for the days when you want to workout, but are feeling like a bit of a lazy betch. Your lower abs will be burning after this!

Sometimes I have absolutely no desire to workout. Like, more often than you would think. Maybe it’s just been a long day at work, or i’ve got something else on my mind, but most often I’m just being a lazy betch.


When I’m feeling lazy but I know I SHOULD work out, I do a lazy girl workout. What’s a lazy girl workout, you ask?


For me, a lazy girl workout that doesn’t really require a lot of sweating, standing, moving, or thinking. Doing an ab, back, or arm workout is usually a lazy girl workout. I can lie down for bench press, sit at the lat pull-down machine, or hang out on the floor and do ab exercises for half an hour.


Super. Lazy.


This Lazy Girls Lower Ab workout is probablyyy not long enough for an actual workout. Literally it’s 9 minutes plus rest time. So I’ll do some easy cardio for 30 minutes (aka, sitting on a bike), and finish up with these ab exercises!


I also love it because these exercises seriously target the lower stomach, which many consider a ‘trouble’ area for losing fat.


If you’re looking for a few other ab workout ideas that are slightly less lazy, this Box Workout That Shreds Fat or Cable Core Workout is probably more up your alley.


The Lazy Girls Lower Ab Workout


Set a timer for 3 minutes. Perform each exercise for 10 reps each consecutively, until 3 minutes is up. Rest 2 minutes and repeat for 3 rounds total.


The Lazy Girls Lower Ab Workout: Perfect for the days when you want to workout, but are feeling like a bit of a lazy betch. Your lower abs will be burning after this!

1. Raised Leg Sit Ups: Start on your back with your legs in the air, and knees bent. Place your hands lightly beside your ears, elbows out wide. Without pulling your head, crunch your chest up towards your knees. Pause for a half second, and then come back down to starting position. Try to keep your shoulders off the ground for every rep and perform each movement slowly and with good form


The Lazy Girls Lower Ab Workout: Perfect for the days when you want to workout, but are feeling like a bit of a lazy betch. Your lower abs will be burning after this!

2. Alternating Leg V-Ups: Start on your back with your legs extended straight out, forming an upside down V. Crunch your entire upper body up, reaching with your left hand to your right foot. Come back down to starting position. Repeat the movement, except this time with your right hand and left leg. Be sure to twist your torso so that it faces the direction you are reaching. Both sides equals one rep.


The Lazy Girls Lower Ab Workout: Perfect for the days when you want to workout, but are feeling like a bit of a lazy betch. Your lower abs will be burning after this!

3. Flutter Kicks: Start again on your back, with legs pointed straight out in front of you. Lift your feet off the ground a few inches, making sure your lower back is planted firmly into the ground. Flutter your feet up and down, similar to kicking in swimming. Don’t allow your legs to move too much, keep the movement small and controlled. Kicking with both feet equals one rep.


The Lazy Girls Lower Ab Workout: Perfect for the days when you want to workout, but are feeling like a bit of a lazy betch. Your lower abs will be burning after this!

4. Upright Bicycles: This exercise is similar to the regular bicycle exercise, except you will be sitting upright rather than lying down. Place your hands gently beside your ears, making sure you are not using them to pull your head. Twist your torso to the left, bringing your left knee up simultaneously. Come back to centre, and keep moving all the way through to the opposite side. As you do, bring your right knee up to your chest. Both sides equals one rep


The Lazy Girls Lower Ab Workout: Perfect for the days when you want to workout, but are feeling like a bit of a lazy betch. Your lower abs will be burning after this!

What About You?!


  • Do you have a workout that you like to do on your ‘lazy’ days?

Original article and pictures take borntosweat.co site

пятница, 27 мая 2016 г.

The Importance of Pre and Post-Workout Stretching

The Importance of Pre and Post-Workout Stretching

I’ve heard a lot about stretching. Some people call it a waste of time, referring to the repetitiveness and lack of excitement in it all. Yes, stretching can be a tad on the less adventurous side, but more and more research has expressed how integral it can be to athletic performance, recovery, and injuries.


Unfortunately, there has also been a lot of misinformation about stretching. I remember when I played baseball, an old coach of mine had drilled into my head the importance of stretching the exact same way both before and after games. This involved what can be referred to as static stretching, which involves holding your muscles until you feel a light strain. For example, raising your shoulder over your head and pulling on your triceps would be an example of a static stretch. The problem with static stretching however is that it actually forces your muscles to relax, something you don’t want them to do if you’re about to head out for a run or hit the weight room. Ideally, you’d want your muscles to be as strong as possible before beginning a workout.


While static stretching isn’t the best idea for before a workout, it can do wonders for you post-workout. This is when you would ideally want your muscles to relax, so that they can properly recover from what you just put them through. Furthermore, static stretching after workouts can help prevent injuries and help your muscles recover much faster.


So, what should you do before a workout? The answer is something called dynamic stretching.


Think of dynamic stretching as more of a warm-up for your muscles. These involve wide range movements, instead of static holds for your muscles. An example could be moving your arms in circles to get the blood flowing in your muscles, or a few low-impact squats. The goal here is to get your entire body ready for the workout, and to loosen up your muscles. Dynamic stretching can also elevate your heart rate better than static stretching and get your entire body ready for the rigours of your exercise program.


Photo Credit: Nicholas_T


References: Men's Health


  • Want sexy thighs that work for you? Here's a...

  • I'm really rather unmotivated today! Call it...

  • To me, age is a statistic, not a burden. I am a world-class...


Original article and pictures take www.naturallysavvy.com site

понедельник, 23 мая 2016 г.

The Importance of Ankle Mobility and Dorsiflexion

The Importance of Ankle Mobility and Dorsiflexion
Lindsey Dorsiflexion

The Importance of Ankle Mobility and Dorsiflexion


When is the last time you paid attention to the mobility in your ankles?


Do you spend any time in your pre-warm up or post workout stretching focusing on your dorsiflexion?


A little attention in this area can go a long way. In fact, improved flexion of the foot can help your squatting, sprinting, strength, and your ability to avoid injuries in the knee, hips and low back areas.


What is Dorsiflexion?


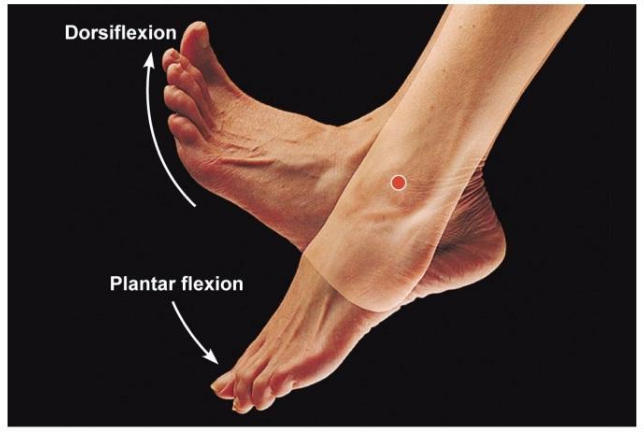
The ankle is a hinge joint that allows the foot to move in the sagittal plane. Within this plane, there are two specific movements; dorsiflexion and plantar flexion. The ability to move the top of the foot closer to the shin is called dorsiflexion.


Ankle Dorsiflexion

Why is Dorsiflexion Important?


Dorsiflexion is important because it allows the tibia (the shin bone) to move forward freely. If the tibia is stuck in a vertical position, it can cause the top of our body to lean forward to make up for the lack of mobility in the ankle when squatting [1]. This is particularly apparent in front squats and overhead squats.


If our lack of mobility in the front squat and the overhead squat is there, this will directly affect our ability to get into a good position in the clean and the squat. It’s a downward spiral.


When our tibia is stuck in a vertical position and our chest is forward, this decreases our ability to create force through the hips to drive heavy loads. In essence, we’re unable to reach the maximum potential in our lifts because the direction of force is not being applied efficiently. If you watch the best squatters in the world, they have amazing ankle dorsiflexion and their chest is almost always in a vertical position above the hips. Force applied straight up and down is far greater than that force applied backwards, forwards, and then, eventually, up.


Dorsiflexion is also important for sprinters. The ability to pick the foot off the ground quickly (dorsiflexion) and to apply force when it strikes the ground (plantarflexion) can increase speed and efficiency when running as well [2].


Studies have been conducted to show that poor ankle mobility has had direct impact on many hip and knee injuries. A person with poor dorsiflexion is more likely to suffer from a torn ACL than someone with great mobility in that area [3].


Causes of Poor Dorsiflexion


Like anything else, there can be a number of factors contributing to poor dorsiflexion. A couple of the common ones are listed below:


  1. A lack of flexibility of the muscles in the calf. Perhaps they have shortened over time due to the raised heel in some shoes. (Ladies – this is a good reason to avoid wearing pumps all the time! Check out A Tale of Two Feet for more on this.)

  1. For many former field athletes, previous injuries to the ankle could be the cause of poor mobility there. Have your rolled your ankle in the past? Sprained it? These injuries can lead to tight joint capsules or scar tissue buildup [1].

  1. Any injuries to the legs that have caused even a temporary change in the way we walk can also lead to ankle mobility issues. Limping, favoring one leg over another due to knee injury or hip injury can cause issues in the ankle as well.

Whatever the case, paying a little bit of attention to this area in your warm-up routine or post workout stretching can only help the situation. Stay tuned for some tests to figure out if you suffer from poor dorsiflexion and some drills to help you figure out what to do about it.


Sources


[1] Imbo, William. “Ankle Mobility: Why it’s Important and How to Improve It.” Box Life Magazine 13 June 2014: n. pag. Web.


[2] ARCHER, L. (2006) Ways to improve the dorsiflexion and plantar flexion action of the foot. Brian Mackenzie’s Successful Coaching, (ISSN 1745-7513/ 32/ May), p. 5


[3] Fong, Chun-Man et al. “Ankle-Dorsiflexion Range of Motion and Landing Biomechanics.” Journal of Athletic Training 46.1 (2011): 5–10. PMC. Web. 31 Mar. 2016.


Original article and pictures take www.crossfitinvictus.com site

понедельник, 16 мая 2016 г.

The go-to post-workout stretching routine you shouldn't skip

The go-to post-workout stretching routine you shouldn't skip
A 10-minute basic stretching routine that will help your body age stronger

Flexibility is one of the five components of fitness, which means it's every bit as important as the other four components (body composition, muscular endurance, muscular strength and cardiovascular endurance), even though it's perpetually overlooked and under-emphasized.


The reason why regular stretching is so important is that flexibility — and its byproduct range of motion — deteriorate over time and with age. You've probably noticed that older adults often have shorter gaits than children and younger adults. Older people are less steady on their feet, struggle more with quick changes of direction and are generally less agile. While some of these negative physiological changes are due to neurological or inner ear problems, many are due to a simple lack of flexibility.


You see, as muscles become less flexible and stiffer, range of motion around a joint declines. When range of motion decreases, it becomes more difficult to move naturally and quickly around that joint. For instance, if your lower back and hips lose flexibility, your range of motion in your back and hips will decrease. As a result, it'll be more difficult to bend, twist, walk or step laterally. Your gait might shorten and slow, and you might realize when you get knocked off balance, or need to move quickly to avoid a collision, it becomes more difficult to stay on your feet. Many falls experienced by older adults are a result of limited range of motion and an inability to recover when balance is challenged.


The good news is it's not hard to maintain or even increase flexibility. The American College of Sports Medicine recommends that adults stretch two or three days a week, targeting all major muscle groups.


Simply add this 10-minute stretching routine to the end of your regular workout to reap the benefits of flexibility training. Hold each stretch for the time suggested.


1. Triceps stretch


A 10-minute basic stretching routine that will help your body age stronger

Grasp just above your elbow with your opposite hand and allow the hand of the stretching muscle to reach down your back. You should feel the stretch along your triceps. Hold for 30 seconds before switching sides.


2. Cross-body shoulder stretch


A 10-minute basic stretching routine that will help your body age stronger

Grasp just above or below your elbow with your opposite hand and pull the arm of the stretching muscle toward your body. You should feel the stretch along the back of your shoulder and into your upper back. Hold for 30 seconds before switching sides.


3. Chest opener


A 10-minute basic stretching routine that will help your body age stronger

Clasp both hands behind your back, your arms straight. Pull your hands down to feel a stretch across your chest. Look up to deepen the stretch and further open up the chest. Hold for 30 seconds.


4. Quad stretch


A 10-minute basic stretching routine that will help your body age stronger

Grasp just above the ankle with your same-side hand as you pull your heel in toward your butt. Try to tuck your tailbone under and point your kneecap toward the floor. Hold for 30 seconds before switching sides.


5. Wide-leg forward fold


A 10-minute basic stretching routine that will help your body age stronger

To stretch your hamstrings, glutes and inner thighs, step your feet out wide and carefully roll your body forward toward the floor. Place your hands on the ground, on your shins or reaching back between your legs. Allow your neck to hang loose. Hold for 30 seconds, then move steadily into the next stretch.


6. Standing straddle stretch


A 10-minute basic stretching routine that will help your body age stronger

Moving from the wide-leg forward fold, walk your hands carefully over to your right side with your hands on the floor, your shins or your quads. Hold for 30 seconds before walking your hands to the center, then all the way across your body to repeat on the opposite side.


7. Sumo stretch


A 10-minute basic stretching routine that will help your body age stronger

After returning to standing from the standing straddle stretch, keep your legs wide, bend both knees and lower yourself into a wide-leg squat with your knees tracking with your toes (not buckling in). Place your hands on your thighs to support yourself in the stretch, allowing your hips to open. Hold for 30 seconds.


8. Hip flexor stretch


A 10-minute basic stretching routine that will help your body age stronger

To stretch along the front of your hips — an area known for tightness — kneel on the ground, one leg in front. Place your hands on your front thigh and shift your weight forward to lengthen your back leg as you keep your torso upright. You should feel the stretch along the front of the hip of your back leg. Hold for 30 seconds before switching sides.


9. Calf stretch


A 10-minute basic stretching routine that will help your body age stronger

In a full push-up position, with your weight supported on the balls of your feet, hook one foot behind your opposite ankle, press back through your supporting heel to feel a stretch along the back of your supporting calf. Hold for 30 seconds before switching sides.


10. Butterfly


A 10-minute basic stretching routine that will help your body age stronger

Sit on the ground with the soles of your feet touching and draw your heels as close in to your body as you can. Lean forward slightly to deepen the stretch — and if you can, place your elbows on your inner thighs to press them further into the ground. Hold for 30 seconds.


11. Bridge


A 10-minute basic stretching routine that will help your body age stronger

Lie on your back, your knees bent and your feet flat on the ground. Press your hips up toward the ceiling and bring your hands together under your body. If you can, walk your shoulders in toward each other to support a deeper stretch. You should feel this along the entire front side of your body. Hold for 30 seconds.


12. Spinal twist


A 10-minute basic stretching routine that will help your body age stronger

Lie on your back and stretch your arms out to the sides, forming a T. Bend one knee and place your foot on the ground. Allow the knee to carefully fall over your straight leg as your spine begins to twist. This should be a controlled motion. Keep both shoulders on the ground and look over your arm to the opposite side. The knee that's bent does not have to touch the ground. Hold for 30 seconds before switching sides.


More health and fitness


4-Week fitness challenge to make you feel incredible

The Bachelor exercise game to burn calories while you watch

One-song workout: A full-body drill to Beyoncé's 'Flawless' remix


Original article and pictures take www.sheknows.com site

четверг, 28 апреля 2016 г.

The Foam Roller Strength Routine

The Foam Roller Strength Routine

The firm foam cylinder is ideal for easing out muscle knots and soreness post-workout (see: 7 awesome ways to use a foam roller), but that’s not all it’s good for in your fitness routine. Try these five exercises to get a whole different kind of slow burn. Do 15 reps of each move then go on to the next, only resting if you need to. Aim for four sets for a 25-minute total-body tone-up. Finish off your sweat session, of course, by rolling out your muscles from head to toe.


—Amy Roberts, NASM-CPT


This one targets the glutes and hamstrings. (A) Stand with your feet shoulder-width apart, and place the roller up on end about a foot and a half in front of you. (B) With your hands atop the roll end, slowing hinge at your hips, sending the roll forward at an angle, and your butt back behind you; your knees will bend slightly. Contract your butt and backs of legs and press your hips forward to lift your body back to standing. Do 15 slow, deliberate reps.


Hit your chest, arms, and shoulders with this variation to the bench press—the roll adds instability so more muscles engage, and also allows your elbows to drop lower so you’ll get a greater range of motion. (A) Grab a pair of heavy dumbbells (at least 10 pounds). Lie down atop the foam roller the long way, so the cylinder is along your spine and supporting your head, and hold the dumbbells out to the sides, elbows bent so your upper arms are in the same line. (B) Press your arms straight up so your hands hover above your chest and the dumbbell ends come close together but don’t touch. Resist the weight as you lower your arms back down. Do 15 slow reps. (For a greater focus on your triceps, keep your elbows in close to your body.)


This simple tweak to an already-core-challenging hold makes the upper back work even harder. (A) Rest your knees on the floor and place the foam roll perpendicular to your body, hands resting on it. (B) Come up into a solid straight-arm plank position, toes tucked behind you and hips level with or just lower than your shoulders. Aim to hold it for 30 seconds. Feeling little too wobbly on your hands? Come down onto your forearms, placing the roll under the meatiest part of them.


Adding the roller here taxes the shoulders and engages the chest. (A) Stand with feet hip-width apart, holding the roll down in front of you with hands on either end. (B) With straight arms, begin pressing in on either end of the roll while simultaneously raising the roll so it’s parallel to the ground. Keep pressing in with your hands as you lower the roll to the start position. Do your 15 reps at a slow, controlled pace.


Here’s a great move for fab abs. (A) Lie on your back, holding the roll the long way at the top end above your body. (B) Bend your knees and lift them up toward your hands, pinching the lower end of the roll between your feet. (C) Release the roll from your hands, then extend both arms and legs out (the roll is between your feet/legs). (D) Slowly bring legs and arms back in, passing the roll from feet to hands then extending your body again (roll is now in your hands). That’s one rep; do 15.


Original article and pictures take www.womenshealthmag.com site