Stop and Stretch! Postrun Relief For Your Lower Back
Long runs, improper form, and hilly terrain can all lead to a strained and pained lower back after a run. Remedy the situation ASAP with these four postrun stretches you can do anywhere to relieve lower-back pain.
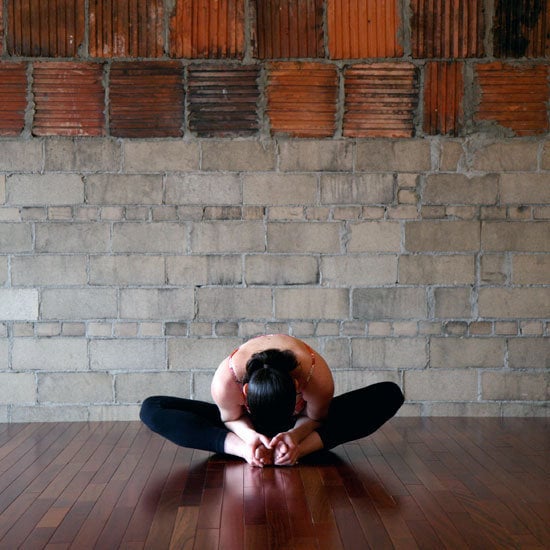
Butterfly
Sit on the floor and bend both knees like you're about to sit cross-legged. Bring your feet together.
Using your hands, press the bottoms of your feet together while using your elbows to press your knees toward the floor.
Stay here for five breaths.
Extend your arms out in front of you to deepen the stretch and stay for a few breaths.
Reclining Twist
Lie flat on your back. Draw both knees in toward your chest and squeeze them toward you with your arms.
Inhale and extend your knees straight up in the air (or keep your legs bent for a more beginner-friendly variation).
As you exhale, open your left arm, gaze to the left side, and drop your legs toward the right. Reach for your thigh, ankle, or foot if your legs are extended. If they are bent, extend your right arm to your side. Look toward your open left hand.
Hold for at least five breaths before coming back to center and then dropping your legs toward the left while gazing to your right.
If you don't want to lie on the ground, do a seated twist instead. Learn how to do this stretch and one more after the break.
Seated Twist
Photo: POPSUGAR Studios
To do the seated twist, begin seated on the ground with your legs extended in front of you.
Bend your right knee and place your right heel as close to your left sit bone as you can. Hug your right knee into your chest with your left arm as you twist to look over your right shoulder. Reach your right arm behind you to increase the stretch.
Stay here for five or more breaths, lengthening the spine on the inhale and increasing the twist on the exhale. Then release the twist, straighten your legs out in front of you, and do this stretch on the other side.
Hip Flexor Stretch
Find soft ground in front of a wall (or do this at home with a towel placed about eight inches away from a wall).
Place your left knee on the towel and your toes against the wall.
With your right foot planted firmly on the ground in front of you, slowly bend your right knee and lower your hips down until you feel a stretch in the front of your left hip. Make sure your right knee doesn't move past your right ankle.
Place your hands on your front knee to help keep your torso straight. Stay here for at least 30 seconds.
To increase the stretch, lift your left arm overhead and side bend to the right. Then slowly release and do this stretch on the other side.
Original article and pictures take media1.popsugar-assets.com site
Static Stretching Reduces Muscle Strength and Force
Active stretching, dynamic stretching - there is always a debate about stretching. A study recently conducted in Brazil investigated the influence that active stretching had on maximal isometric muscle strength and rate of force development. This was determined using time intervals of 30, 50, 100, and 200 milliseconds relative to the onset of muscle contraction. It has been proposed that along with increasing the range of motion, stretching may also improve performance and reduce injuries. On the other hand, some studies have shown that maximal voluntary contraction, torque, and jump height are negatively affected by stretching.1
Static Stretching Reduces Muscle Strength and Force - Fitness, stretching, Recovery, mobility, static stretching
The fifteen men participating in the study were physical education students involved in recreational sports (soccer, basketball, volleyball). Each subject had not participated in regular strength training for at least six months before the start of the study. Each subject performed three separate sessions that were separated by 3-5 days. The first session involved 5 maximal isometric contractions for knee extensors in the isokinetic dynamometer. The next two sessions the subjects randomly performed two maximal isometric contractions for the knee extensors in the isokinetic dynamometer to determine the maximal voluntary contraction (MVC) and the rate of force development (RFD), and two active static stretching exercises for the dominant leg extensors (10x30 seconds for each exercise with 20-second rest intervals between sets). Immediately after stretching (approximately three minutes), the isokinetic test was repeated. The RFD was calculated using the average slope of the moment-time curve at time intervals of 0-30, 0-50, 0-100, 0-150, and 0-200 milliseconds relative to the onset of muscle contraction.2
The results of the study revealed that the MVC was reduced after stretching. The RFD at intervals 0-30, 0-50, and 0-100 milliseconds did not change after stretching. However, the RFD measured at intervals of 0-150 and 0-200 was significantly lower after stretching. Consequently, it can be concluded that explosive muscular actions of a very short duration seem less affected by active static stretching when compared with actions using maximal muscle strength.3
The results of this research were very similar to that in other studies. Prior studies have shown that acute static stretching impairs muscle force and torque. In this particular study, the MVC was reduced by 5%, which is consistent with previous research. This was the first research known to be conducted that analyzed the effects of stretching on their RFD measured at different time intervals from the onset of contraction. This was also reduced by about 5-7% in this particular study, and similar to maximal strength, the lower RFD after stretching may also be explained by the reduction of muscle-tendon stiffness. Data from this research may help explain the different effects that stretching has on explosive movements.4
Original article and pictures take cdn6.omidoo.com site
Start Your Morning Centered With 5 Helpful Yoga Moves
We're pumped to present our fave story of the week from POPSUGAR Fitness!
Imagine starting the day calm, cool, collected, and energized -- from a method beyond caffeine! Whether you're new to the world of yoga or you have a consistent practice, these five asanas are ideal ways to start the day.
Tipover Tuck
Photo: Jenny Sugar
Begin standing with your feet hips-width-distance apart. Engage your abs by drawing your navel toward your spine.
Bring your arms behind you, and interlace your fingers right below your sacrum (back of your pelvis). If you can, press the heels of your palms together in a kind of double fist. Actively pull your hands away from your shoulders to increase the stretch in your chest.
From here, lean your chest forward and lift your hands up overhead as you fold your torso toward your thighs. If you're only concerned with feeling this stretch in your chest and shoulders, then keep your knees bent. To bring this stretch into your hamstrings and lower back, straighten your legs. Make sure you're lengthening through your spine by reaching the top of your head toward the floor.
Stay like this for at least 30 seconds, and when you're ready to come out, actively press into your feet, engage your thighs, and slowly lift your torso back up to a standing position.
Downward Dog
Photo: Jenny Sugar
Begin on your hands and knees. Your wrists should be underneath your shoulders, and your knees underneath your hips.
Inhale as you tuck your toes under your heels. Then exhale to lift your hips, coming into an upside-down V shape called Downward Facing Dog.
Spread your fingers wide and create a straight line between your middle fingers and elbows. Work on straightening your legs and lowering your heels toward the ground. Your heels should be slightly wider than your toes so the outside edges of your feet are parallel with the outside edges of your mat. Relax your head between your arms, and direct your gaze through your legs or up toward your belly button. Hold for at least five breaths.
Warrior 3
Photo: Jenny Sugar
Begin in Warrior 1 with your right knee forward, lower your torso, and lift your left leg, bringing your body parallel with the ground.
Extend your hands out in front of you, pressing your palms together firmly. If it bothers your shoulders to press your hands together, then separate your arms so they're shoulder-width apart. If extending your arms creates pain or pressure in your lower back, then rest your hands on your hips.
Engage your abs, holding this position for five deep breaths. Then lower your left leg, returning to Warrior 1. Release your hands to the mat and come into a quick Downward Dog. Step your left leg forward, coming into Warrior 1.
Repeat Warrior 3 on the left side.
Bow Pose
Source: Megan Wolfe Photography
Lie on your belly. Bend your knees and hold onto the outside edge of your right ankle and then your left. Once you have a firm hold of each ankle, try to keep your toes together, either pointing or flexing your feet.
Lift your feet up as high as you can, and shift your weight forward so you're resting on your naval instead of on your pubic bone.
Hold for five deep breaths, and then slowly release.
Child's Pose
Photo: Jenny Sugar
Kneel on your mat with your knees hips-width-distance apart and your big toes touching behind you. Take a deep breath in and, as you exhale, lay your torso over your thighs. Try to lengthen your neck and spine by drawing your ribs away from your tailbone and the crown of your head away from your shoulders.
Rest your arms beside your legs, with palms facing up, or try extending your arms out in front of you.