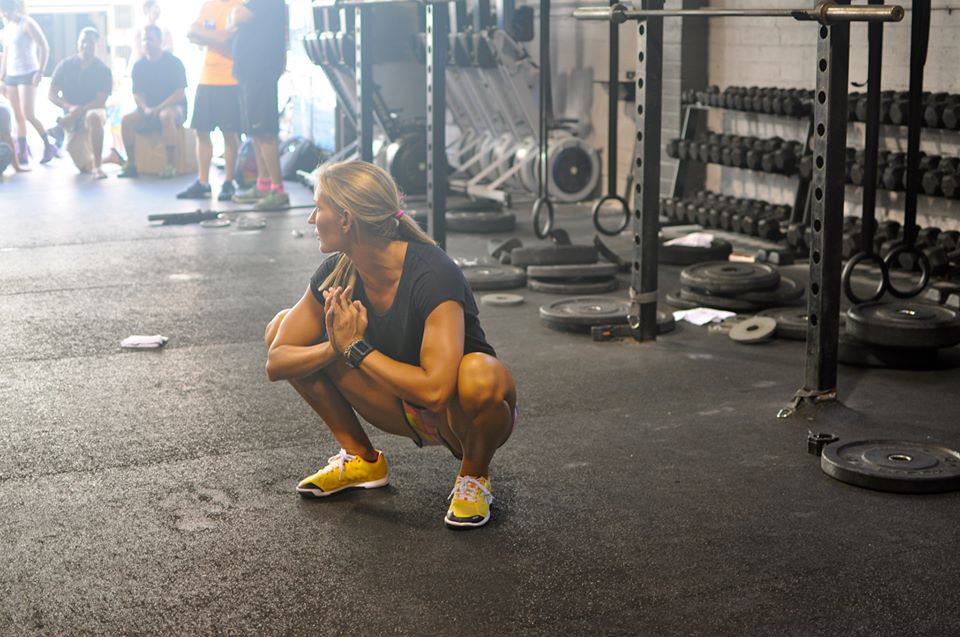
Sometimes I have absolutely no desire to workout. Like, more often than you would think. Maybe it’s just been a long day at work, or i’ve got something else on my mind, but most often I’m just being a lazy betch.
When I’m feeling lazy but I know I SHOULD work out, I do a lazy girl workout. What’s a lazy girl workout, you ask?
For me, a lazy girl workout that doesn’t really require a lot of sweating, standing, moving, or thinking. Doing an ab, back, or arm workout is usually a lazy girl workout. I can lie down for bench press, sit at the lat pull-down machine, or hang out on the floor and do ab exercises for half an hour.
Super. Lazy.
This Lazy Girls Lower Ab workout is probablyyy not long enough for an actual workout. Literally it’s 9 minutes plus rest time. So I’ll do some easy cardio for 30 minutes (aka, sitting on a bike), and finish up with these ab exercises!
I also love it because these exercises seriously target the lower stomach, which many consider a ‘trouble’ area for losing fat.
Set a timer for 3 minutes. Perform each exercise for 10 reps each consecutively, until 3 minutes is up. Rest 2 minutes and repeat for 3 rounds total.
1. Raised Leg Sit Ups: Start on your back with your legs in the air, and knees bent. Place your hands lightly beside your ears, elbows out wide. Without pulling your head, crunch your chest up towards your knees. Pause for a half second, and then come back down to starting position. Try to keep your shoulders off the ground for every rep and perform each movement slowly and with good form
2. Alternating Leg V-Ups: Start on your back with your legs extended straight out, forming an upside down V. Crunch your entire upper body up, reaching with your left hand to your right foot. Come back down to starting position. Repeat the movement, except this time with your right hand and left leg. Be sure to twist your torso so that it faces the direction you are reaching. Both sides equals one rep.
3. Flutter Kicks: Start again on your back, with legs pointed straight out in front of you. Lift your feet off the ground a few inches, making sure your lower back is planted firmly into the ground. Flutter your feet up and down, similar to kicking in swimming. Don’t allow your legs to move too much, keep the movement small and controlled. Kicking with both feet equals one rep.
4. Upright Bicycles: This exercise is similar to the regular bicycle exercise, except you will be sitting upright rather than lying down. Place your hands gently beside your ears, making sure you are not using them to pull your head. Twist your torso to the left, bringing your left knee up simultaneously. Come back to centre, and keep moving all the way through to the opposite side. As you do, bring your right knee up to your chest. Both sides equals one rep
What About You?!
Do you have a workout that you like to do on your ‘lazy’ days?
Original article and pictures take borntosweat.co site
I’ve heard a lot about stretching. Some people call it a waste of time, referring to the repetitiveness and lack of excitement in it all. Yes, stretching can be a tad on the less adventurous side, but more and more research has expressed how integral it can be to athletic performance, recovery, and injuries.
Unfortunately, there has also been a lot of misinformation about stretching. I remember when I played baseball, an old coach of mine had drilled into my head the importance of stretching the exact same way both before and after games. This involved what can be referred to as static stretching, which involves holding your muscles until you feel a light strain. For example, raising your shoulder over your head and pulling on your triceps would be an example of a static stretch. The problem with static stretching however is that it actually forces your muscles to relax, something you don’t want them to do if you’re about to head out for a run or hit the weight room. Ideally, you’d want your muscles to be as strong as possible before beginning a workout.
While static stretching isn’t the best idea for before a workout, it can do wonders for you post-workout. This is when you would ideally want your muscles to relax, so that they can properly recover from what you just put them through. Furthermore, static stretching after workouts can help prevent injuries and help your muscles recover much faster.
So, what should you do before a workout? The answer is something called dynamic stretching.
Think of dynamic stretching as more of a warm-up for your muscles. These involve wide range movements, instead of static holds for your muscles. An example could be moving your arms in circles to get the blood flowing in your muscles, or a few low-impact squats. The goal here is to get your entire body ready for the workout, and to loosen up your muscles. Dynamic stretching can also elevate your heart rate better than static stretching and get your entire body ready for the rigours of your exercise program.
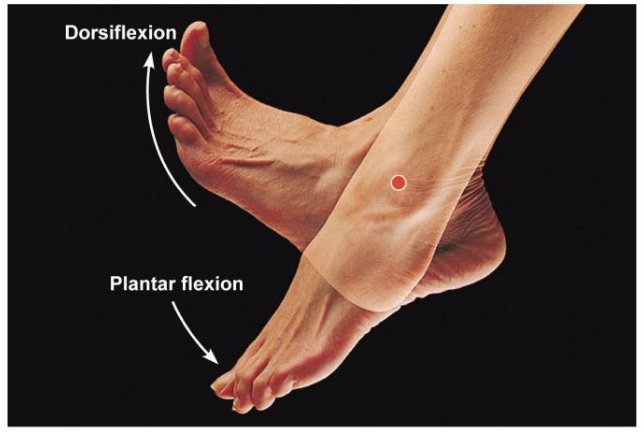
When is the last time you paid attention to the mobility in your ankles?
Do you spend any time in your pre-warm up or post workout stretching focusing on your dorsiflexion?
A little attention in this area can go a long way. In fact, improved flexion of the foot can help your squatting, sprinting, strength, and your ability to avoid injuries in the knee, hips and low back areas.
What is Dorsiflexion?
The ankle is a hinge joint that allows the foot to move in the sagittal plane. Within this plane, there are two specific movements; dorsiflexion and plantar flexion. The ability to move the top of the foot closer to the shin is called dorsiflexion.
Why is Dorsiflexion Important?
Dorsiflexion is important because it allows the tibia (the shin bone) to move forward freely. If the tibia is stuck in a vertical position, it can cause the top of our body to lean forward to make up for the lack of mobility in the ankle when squatting [1]. This is particularly apparent in front squats and overhead squats.
If our lack of mobility in the front squat and the overhead squat is there, this will directly affect our ability to get into a good position in the clean and the squat. It’s a downward spiral.
When our tibia is stuck in a vertical position and our chest is forward, this decreases our ability to create force through the hips to drive heavy loads. In essence, we’re unable to reach the maximum potential in our lifts because the direction of force is not being applied efficiently. If you watch the best squatters in the world, they have amazing ankle dorsiflexion and their chest is almost always in a vertical position above the hips. Force applied straight up and down is far greater than that force applied backwards, forwards, and then, eventually, up.
Dorsiflexion is also important for sprinters. The ability to pick the foot off the ground quickly (dorsiflexion) and to apply force when it strikes the ground (plantarflexion) can increase speed and efficiency when running as well [2].
Studies have been conducted to show that poor ankle mobility has had direct impact on many hip and knee injuries. A person with poor dorsiflexion is more likely to suffer from a torn ACL than someone with great mobility in that area [3].
Causes of Poor Dorsiflexion
Like anything else, there can be a number of factors contributing to poor dorsiflexion. A couple of the common ones are listed below:
A lack of flexibility of the muscles in the calf. Perhaps they have shortened over time due to the raised heel in some shoes. (Ladies – this is a good reason to avoid wearing pumps all the time! Check out A Tale of Two Feet for more on this.)
For many former field athletes, previous injuries to the ankle could be the cause of poor mobility there. Have your rolled your ankle in the past? Sprained it? These injuries can lead to tight joint capsules or scar tissue buildup [1].
Any injuries to the legs that have caused even a temporary change in the way we walk can also lead to ankle mobility issues. Limping, favoring one leg over another due to knee injury or hip injury can cause issues in the ankle as well.
Whatever the case, paying a little bit of attention to this area in your warm-up routine or post workout stretching can only help the situation. Stay tuned for some tests to figure out if you suffer from poor dorsiflexion and some drills to help you figure out what to do about it.
Sources
[1] Imbo, William. “Ankle Mobility: Why it’s Important and How to Improve It.” Box Life Magazine 13 June 2014: n. pag. Web.
[2] ARCHER, L. (2006) Ways to improve the dorsiflexion and plantar flexion action of the foot. Brian Mackenzie’s Successful Coaching, (ISSN 1745-7513/ 32/ May), p. 5
[3] Fong, Chun-Man et al. “Ankle-Dorsiflexion Range of Motion and Landing Biomechanics.” Journal of Athletic Training 46.1 (2011): 5–10. PMC. Web. 31 Mar. 2016.
Original article and pictures take www.crossfitinvictus.com site
The go-to post-workout stretching routine you shouldn't skip A 10-minute basic stretching routine that will help your body age stronger
Flexibility is one of the five components of fitness, which means it's every bit as important as the other four components (body composition, muscular endurance, muscular strength and cardiovascular endurance), even though it's perpetually overlooked and under-emphasized.
The reason why regular stretching is so important is that flexibility — and its byproduct range of motion — deteriorate over time and with age. You've probably noticed that older adults often have shorter gaits than children and younger adults. Older people are less steady on their feet, struggle more with quick changes of direction and are generally less agile. While some of these negative physiological changes are due to neurological or inner ear problems, many are due to a simple lack of flexibility.
You see, as muscles become less flexible and stiffer, range of motion around a joint declines. When range of motion decreases, it becomes more difficult to move naturally and quickly around that joint. For instance, if your lower back and hips lose flexibility, your range of motion in your back and hips will decrease. As a result, it'll be more difficult to bend, twist, walk or step laterally. Your gait might shorten and slow, and you might realize when you get knocked off balance, or need to move quickly to avoid a collision, it becomes more difficult to stay on your feet. Many falls experienced by older adults are a result of limited range of motion and an inability to recover when balance is challenged.
The good news is it's not hard to maintain or even increase flexibility. The American College of Sports Medicine recommends that adults stretch two or three days a week, targeting all major muscle groups.
Simply add this 10-minute stretching routine to the end of your regular workout to reap the benefits of flexibility training. Hold each stretch for the time suggested.
1. Triceps stretch
Grasp just above your elbow with your opposite hand and allow the hand of the stretching muscle to reach down your back. You should feel the stretch along your triceps. Hold for 30 seconds before switching sides.
2. Cross-body shoulder stretch
Grasp just above or below your elbow with your opposite hand and pull the arm of the stretching muscle toward your body. You should feel the stretch along the back of your shoulder and into your upper back. Hold for 30 seconds before switching sides.
3. Chest opener
Clasp both hands behind your back, your arms straight. Pull your hands down to feel a stretch across your chest. Look up to deepen the stretch and further open up the chest. Hold for 30 seconds.
4. Quad stretch
Grasp just above the ankle with your same-side hand as you pull your heel in toward your butt. Try to tuck your tailbone under and point your kneecap toward the floor. Hold for 30 seconds before switching sides.
5. Wide-leg forward fold
To stretch your hamstrings, glutes and inner thighs, step your feet out wide and carefully roll your body forward toward the floor. Place your hands on the ground, on your shins or reaching back between your legs. Allow your neck to hang loose. Hold for 30 seconds, then move steadily into the next stretch.
6. Standing straddle stretch
Moving from the wide-leg forward fold, walk your hands carefully over to your right side with your hands on the floor, your shins or your quads. Hold for 30 seconds before walking your hands to the center, then all the way across your body to repeat on the opposite side.
7. Sumo stretch
After returning to standing from the standing straddle stretch, keep your legs wide, bend both knees and lower yourself into a wide-leg squat with your knees tracking with your toes (not buckling in). Place your hands on your thighs to support yourself in the stretch, allowing your hips to open. Hold for 30 seconds.
8. Hip flexor stretch
To stretch along the front of your hips — an area known for tightness — kneel on the ground, one leg in front. Place your hands on your front thigh and shift your weight forward to lengthen your back leg as you keep your torso upright. You should feel the stretch along the front of the hip of your back leg. Hold for 30 seconds before switching sides.
9. Calf stretch
In a full push-up position, with your weight supported on the balls of your feet, hook one foot behind your opposite ankle, press back through your supporting heel to feel a stretch along the back of your supporting calf. Hold for 30 seconds before switching sides.
10. Butterfly
Sit on the ground with the soles of your feet touching and draw your heels as close in to your body as you can. Lean forward slightly to deepen the stretch — and if you can, place your elbows on your inner thighs to press them further into the ground. Hold for 30 seconds.
11. Bridge
Lie on your back, your knees bent and your feet flat on the ground. Press your hips up toward the ceiling and bring your hands together under your body. If you can, walk your shoulders in toward each other to support a deeper stretch. You should feel this along the entire front side of your body. Hold for 30 seconds.
12. Spinal twist
Lie on your back and stretch your arms out to the sides, forming a T. Bend one knee and place your foot on the ground. Allow the knee to carefully fall over your straight leg as your spine begins to twist. This should be a controlled motion. Keep both shoulders on the ground and look over your arm to the opposite side. The knee that's bent does not have to touch the ground. Hold for 30 seconds before switching sides.
The firm foam cylinder is ideal for easing out muscle knots and soreness post-workout (see: 7 awesome ways to use a foam roller), but that’s not all it’s good for in your fitness routine. Try these five exercises to get a whole different kind of slow burn. Do 15 reps of each move then go on to the next, only resting if you need to. Aim for four sets for a 25-minute total-body tone-up. Finish off your sweat session, of course, by rolling out your muscles from head to toe.
—Amy Roberts, NASM-CPT
This one targets the glutes and hamstrings. (A) Stand with your feet shoulder-width apart, and place the roller up on end about a foot and a half in front of you. (B) With your hands atop the roll end, slowing hinge at your hips, sending the roll forward at an angle, and your butt back behind you; your knees will bend slightly. Contract your butt and backs of legs and press your hips forward to lift your body back to standing. Do 15 slow, deliberate reps.
Hit your chest, arms, and shoulders with this variation to the bench press—the roll adds instability so more muscles engage, and also allows your elbows to drop lower so you’ll get a greater range of motion. (A) Grab a pair of heavy dumbbells (at least 10 pounds). Lie down atop the foam roller the long way, so the cylinder is along your spine and supporting your head, and hold the dumbbells out to the sides, elbows bent so your upper arms are in the same line. (B) Press your arms straight up so your hands hover above your chest and the dumbbell ends come close together but don’t touch. Resist the weight as you lower your arms back down. Do 15 slow reps. (For a greater focus on your triceps, keep your elbows in close to your body.)
This simple tweak to an already-core-challenging hold makes the upper back work even harder. (A) Rest your knees on the floor and place the foam roll perpendicular to your body, hands resting on it. (B) Come up into a solid straight-arm plank position, toes tucked behind you and hips level with or just lower than your shoulders. Aim to hold it for 30 seconds. Feeling little too wobbly on your hands? Come down onto your forearms, placing the roll under the meatiest part of them.
Adding the roller here taxes the shoulders and engages the chest. (A) Stand with feet hip-width apart, holding the roll down in front of you with hands on either end. (B) With straight arms, begin pressing in on either end of the roll while simultaneously raising the roll so it’s parallel to the ground. Keep pressing in with your hands as you lower the roll to the start position. Do your 15 reps at a slow, controlled pace.
Here’s a great move for fab abs. (A) Lie on your back, holding the roll the long way at the top end above your body. (B) Bend your knees and lift them up toward your hands, pinching the lower end of the roll between your feet. (C) Release the roll from your hands, then extend both arms and legs out (the roll is between your feet/legs). (D) Slowly bring legs and arms back in, passing the roll from feet to hands then extending your body again (roll is now in your hands). That’s one rep; do 15.
Original article and pictures take www.womenshealthmag.com site
Foam rolling stretches can lead to a successful post-workout recovery. However, oftentimes these exercises and stretches are performed incorrectly, ultimately decreasing your efforts. Increase your recovery success with the dos and don'ts of foam rolling.
Stretches, warm-ups, and cool-downs are just as essential as the main exercise practice. With the popularity of foam roller stretches, how do they accommodate workout recoveries? Should you be foam rolling, too?
What is Foam Rolling?
Foam rolling utilizes a foam roller to provide myofascial release, or the relaxation of contracting muscles. When you exercise, muscle fibers tear and swell and can create adhesions, or thick "knots" of muscle fibers, over time. Foam rolling exercises helps to smooth and lengthen tight muscles. When muscles are relaxed, blood flow and circulation is improved and promote a speedier recovery.
Nonetheless, foam roller stretching can contribute to successful post-workout recoveries. Unfortunately, though, foam rolling exercises are often misperformed, reducing their effectiveness. Increase your recovery success with the dos and don'ts of foam rolling.
DO:
Foam Roll for Recovery
Use foam rolling exercises to help the body recover from sore muscles. Foam rollers can help speed up the post-workout recovery and healing processes, keeping the body healthy and ready to go for the next workout session.
Go Slow
Position the foam roller on the direct muscle you are targeting, then position yourself over the roll. Relax and use your body weight to slowly roll over each area at least 5 to 10 times. Feel free to pause to relieve tension.
Spend More Time on Sensitive Areas
Although you can and should target all body areas, spend more time on sensitive areas. Continue rolling back and forth until the tenderness eases.
Stay Hydrated
Dehydrated muscles can create more harm than good. It is important to stay hydrated and drink lots of water after foam rolling!
DON'T:
Undermine Their Need
Effective foam rolling can be used and needed to rid and reduce muscle adhesions. Do not think foam roller stretching is only for high level athletes!
Only Use for Sore Muscles
Don't assume foam rolling is only for flared muscles. Foam roller exercises can also be used as part of a warm-up or cool-down routine and assist in improving muscle length and flexibility.
Think They're All the Same
Not all foam rollers are created and treated the same. Low-density rollers will provide less pressure compared to more firm, high-density rollers.
Ignore Pain
If you have ever used a foam roller, you may know its use is quite different than a relaxed massage. However, it is important to discontinue rolling if the pain is unbearable. Foam rolling should be uncomfortable, but tolerable.
The Complete Guide to Workout Nutrition [Infographic]
Check out Greatist's other Infographics and ADD this Infographic to your Website/Blog: Simply copy the code below and paste it into the HTML of your blog or website:<a href="http://greatist.com/health/complete-guide-workout-nutrition-infographic" target="_blank"><img src="http://greatist.com/sites/default/files/styles/article_main/public/The-Complete-Guide-to-Workout-Nutrition.png?itok=KX9_fFOG" width="600" height="5701" border="0" /></a><p>Get <a href="http://greatist.com/">health and fitness tips</a> at Greatist.com</p>
The Ultimate Guide to Workout Nutrition
We’re more concerned than ever with maximizing our workout efforts and getting the fastest results. Effective workouts demand complete nutrition, and these simple guidelines will help make the right choices to refuel the body.
Recovery Time is Critical
Recovery should be thought of as a window of opportunity. Approximately 30 minutes after cardio, the body is optimized to replenish its energy stores— muscle and liver glycogen. For strength training, the window is extended up to two hours post-workout. Muscle protein synthesis occurs, setting off muscle tissue recovery and repair, replacing fluids, and helping the body adapt to the stresses of the workout.
Strength Training
Pre-workout: Building lean muscle requires a ready supply of protein for tissue repair. The more intense your efforts, the more protein you’ll need. Carbohydrates should constitute 75 percent of a pre-workout meal, and protein should constitute 25 percent. Protein must first be broken down into amino acids in order to be used by muscles to repair and build lean tissue. 1-2 hours prior to strength training, consume protein in order to have an adequate reserve for the upcoming workout. The amount of protein required is based on body weight, intensity level, length of workout, and gender. Recent studies suggest taking in around 10-20 grams of high-quality protein within 2 hours after strength training is usually enough to jumpstart recovery and prevent muscle loss.
Cardio
Pre-workout nutrition for a cardio session requires more carbs than protein. Carbs give you the energy to power through an intense workout. Carbohydrates should constitute 75-10 percent of a pre-workout meal. Carbs are metabolized into glucose (energy) very quickly. Your pre-workout meal should be consumed between 30-60 minutes before hitting the gym. Add protein and fiber to deliver a steadier supply of energy throughout the workout and prevent fatigue resulting from consuming only carbs. Low glycemic index (GI) carbs release sugar into the bloodstream more slowly and tend to contain more essential nutrients like fiber. They are generally optimal to consume 30-60 minutes prior to either a strength training or cardio workout (also good to consume post-workout). Examples include whole foods like whole grains, vegetables, fruits, and beans. High GI carbs release sugar very quickly, providing a quick but brief energy boost. Best to consume before an intense cardio workout, and examples include white bread, white rice, and packaged snacks.
Strength Training
Your pre-workout meal should include low GI carbs to give you the energy you’ll need, and protein-rich foods to store in reserve. Examples include: Egg white omelet with spinach, whole grain toast, and skim or soy milk. Smoothie of protein powder, soy or skim milk, high GI fruits— such as mango, peach, or pineapple— and flax seed. Greek yogurt with banana, walnuts, apples, and honey.
Cardio
Eat a small snack to help boost blood sugar levels pre-workout, especially if your cardio workout is before your first meal or between meals. Examples include: Whole, mixed grain hot cereal with raisins and walnuts, skim milk, and honey. Scrambled egg whites in a whole grain pita with a sliced apple. Greek yogurt parfait with layers of banana, peaches, and granola. Fruit smoothie made with soy milk, ice, banana, strawberries, and honey or brown sugar.
Post-Workout
After a strength training workout, dietary protein is more readily used for muscle building, rather than fat storage. A protein shake or meal within 2 hours of a workout will give your body what it needs to build lean muscle. Although many believe consuming a protein drink during a strength-training workout is best for building muscle, no significant evidence supports this. After a cardio workout, hydration is the main goal. A significant amount of water is lost through perspiration. Pure water is the best source of hydration of the average exerciser. Sports drinks like Gatorade and PowerAde replenish lost electrolytes, but contain large amounts of sugar and calories. Only athletes may need the extra electrolytes that make sports drinks worth the sugar and calories. Generally, the average workout doesn’t demand the extra calories and electrolytes in sports drinks. Coconut water is a great alternative to sports drinks, offering lots of potassium and magnesium, which restores your electrolytes. Also, after a tough cardio session, your energy resources may need replenishing with a carb-rich snack or meal. Post-Workout choices For strength training, protein and carbohydrates are needed after a workout to help repair muscles, replenish the body’s glycogen stores, and prevent muscle soreness. Examples: Chocolate protein shake with protein powder, skim or soy milk, and a banana. Half an avocado stuffed with cottage cheese and tomato. Spinach salad with a sliced chicken breast. Whole foods are the best option because they offer complete nutrition. They provide many micronutrients and essential fiber and help keep you feeling satiated. The best whole food choices contain complete, high-quality protein and provide nearly every essential vitamin and mineral. These include eggs, fish, chicken breast, turkey, low-fat milk, cottage cheese, and Greek yogurt. For cardio, the key is to replace both carbohydrates and electrolytes lost during a workout. Examples: Banana sliced lengthwise and spread with peanut or almond butter. Mango smoothie with mango chunks, vanilla yogurt, ice, and honey. Sliced apple with a handful of walnuts. Whole grains, fruits, and veggies are the best sources of carbs for a workout. Again, whole foods are best, but smoothies and shakes are a good quick fix. One of the best protein-carb combos is chocolate milk. It provides an optimal balance of carbs and protein and is recommended for both strength and cardio training. Chose low-fat to avoid excess fat and sugar consumption. Consume 8 ounces to obtain necessary nutrients after a workout.
What About Nutrition for Circuit Training?
Circuit training, combining strength training with periods of cardio work, requires just a few adjustments. Have your protein 2-3 hours before your workout. 30-60 minutes before your workout, have a carb-rich snack, such as a piece of fruit and slice of toast, or a mango smoothie. Post-workout, drink plenty of water and have a post-strength training meal with an extra carb, such as a piece of fruit. 30-60 minutes after training, replenish with a 3:1 ratio of carbohydrates and protein to ensure adequate muscle repair and recovery. Consume a regular meal 3-4 hours after a workout. The right workout nutrition is very important, but it doesn’t have to be complicated or difficult to fit in. Plan ahead to ensure the body has the right nutrients for fast, adequate recovery.
What's Good with Derek Flanzraich Original article and pictures take greatist.com site


![The Complete Guide to Workout Nutriton [Infographic]](https://greatist.com/sites/default/files/styles/article-main-x-large-852/public/The-Complete-Guide-to-Workout-Nutrition.png?itok=iSW68wJw)