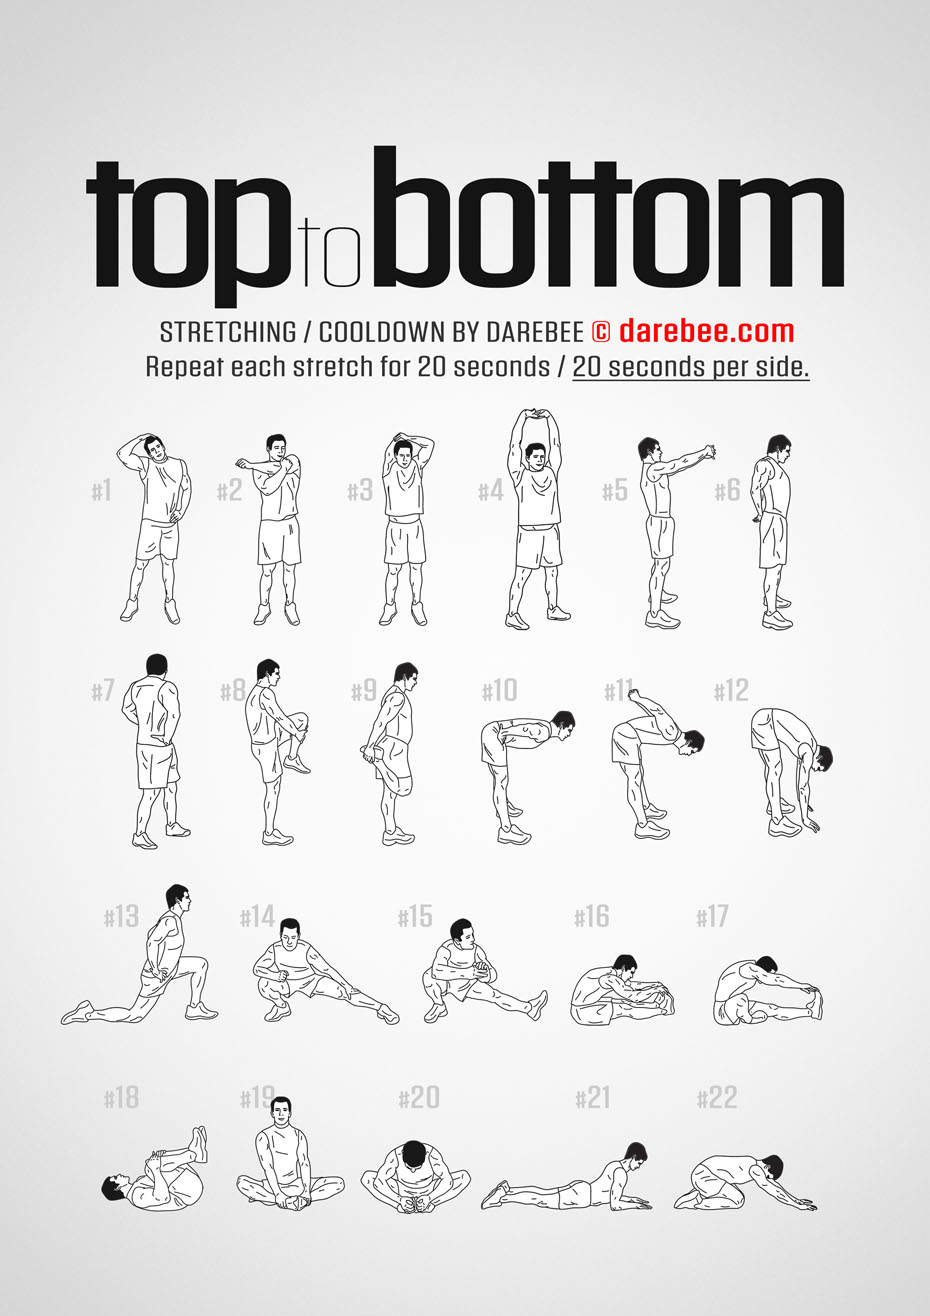
Completing dynamic stretches before a workout will decrease risk of injury and increase athletic performance. Static stretching after will increase range of motion.


Original article and pictures take d1alt1wkdk73qo.cloudfront.net site

If your goal is to get bigger and thicker thighs, this 10-minute workout is perfect for you.
Especially, if you're going for that slim thick figure.
No, we're not talking about adding unwanted layers of fat on your thighs.
But instead, sexy lean thick thighs that are not bulky. You know, the type that you're proud to show strolling on the beach.
This 10-minute bigger thigh workout will definitely stimulate the thigh muscles to grow.
And the good thing is that it won't take long for you to see results.
When it comes down to thigh muscles it's easy to see small changes in a short amount of time.
As long as you stick to the workout plan below along with proper nutrition.
THE 10 MINUTE BIGGER THIGHS WORKOUT OVERVIEW
You'll be doing four separate workouts all hitting the quad muscles consistently.
In particular you will be hitting the major muscle groups of the thigh like the quadriceps femoris[1] which is the four-headed muscle located right in front of the thigh.
The hamstring will get its share of work also to contribute to the overall aesthetic look of your thighs.
Now bear in mind, we are talking about growing muscles therefore, you will need resistance.
The workout plan below can start off with your body weight.
However, after a while you're going to hit a plateau because your muscles will become stronger and accustomed to your own bodyweight.
So you're going to need extra weight to challenge them more to grow.
For this bigger thigh workout you're going to need a pair of dumbbells.
Ideally, the dumbbells should range from 25 to 35 pounds.
Let's go ahead and breakdown each workout, so you know how to perform them properly.
1. DEEP SQUAT PULSES
Just a slight twist on the most popular lower body workout the squat.
Deep Squats have the ability to activate all of your lower body muscles simultaneously.
But most of all your thigh muscles are going to be challenged more, which is what we want.

How to do it
2. LUNGE TO KICK
Note: You can start with either your left or right foot for this workout.

How to do it
3. SHOULDER DUMBBELL SQUATS
For this workout you will definitely need a pair of dumbbells.
Remember that your body weight alone isn't sufficient to stimulate the type of muscle growth you want in your thighs.
Therefore, adding weights to this routine is an absolute necessity.

How to do it
4. SQUAT THROWS
This workout might be unfamiliar to you.
It's based on the same squat movement with a slight twist.
Instead, you'll be engaging your upper body in movement to enhance the amount of work on your quads.
The more stress and tension the muscles encounter, the more they will grow.
For this workout you can add a 20-pound dumbbell, for even more resistance.

How to do it

GETTING THE BEST OUT OF THIS WORKOUT
If you have more than 10 minutes then you can do the whole routine at least 2 to 3 times.
This will give you maximum muscle hypertrophy[2] for better results.
When you complete the workout session your thighs should be on fire.
THE WORKOUT FREQUENCY
Remember that your thighs have some of the largest muscles on your body.
Therefore, you should give it time to rest. Because you want to get the most muscle stimulation 2 to 3 times a week is ideal.
That being said, if you think your muscles need more time to recover, 2 times should be good for you.
SEE THE WORKOUTS IN ACTION
THE THICKER THIGH DIET PLAN
Here's the thing, none of this will work unless you have the nutrition to back it up.
For your thigh muscles to grow, you have to be in a calorie surplus – meaning eating more calories than you burn daily.
This is where a lot of people fail.
You don't want to be giving 100% to your workouts but giving 50% to your diet.
That approach only gives you the turtle-paced results.
If you want to get the fastest results possible you have to pay attention to your diet.
Now this doesn't mean you have to eat clean all the time but at least 90% of the time.
But don't worry, to make your life much easier we've created a full week meal plan that will support any type of muscle development.
Go ahead and check it out here.
Use that meal plan as a guide, whether you want to grow your thighs or glute muscles.
Do squats make your thighs bigger?
Absolutely!
In fact squats targets and activate your thigh muscles more than the glutes.
That's what a lot of persons don't know.
This doesn't mean that squats can't grow your glutes.
It's just that it's not the perfect isolated move for hitting your glutes for maximum growth.
But when it comes on to hitting the thigh muscle group, it's the ultimate move.
That's one of the reasons why this workout is “squat dominant”.
And adding weights to this workout will definitely grow your thighs, if you stay consistent and eat properly.
GIVE THIS BIGGER THIGH WORKOUT A TRY!
Now you know how to get bigger thighs, go ahead and execute the plan right away!
To grow thicker thighs, you have to be consistent with the workout and focus on nutrition to see results.
If after a while the 25 or 35 dumbbell is too light, increase the weight to 40 or 45.
Doing this will keep challenging your thigh muscles to grow to the size you want them to be.
Sore, stiff, tight? We feel you. Take some time for self-massage. Used pre-workout, pre-stretching, or simply to start the day, foam rolling has serious benefits, including easing muscle soreness, correcting muscle imbalance, increasing range of motion, and preventing injury.
Some gyms have foam rollers, but it might be worth investing in your own. (They’re still way cheaper than a professional massage!) Rollers vary in size, firmness, and shape. Long rollers provide more area for stability and support, while shorter options are more versatile and convenient for travel. A soft foam provides a gentler massage than a high-density version. Some options include a grid-like design or a ridged surface, which helps target tough-to-relieve knots and trigger points.
When you get rolling, spend about 60 seconds on each tight area. Use as much or as little pressure as feels comfortable for you. If you find a knot or sensitive spot, linger on it for a little while, rolling back and forth until the tenderness eases. Ten to 15 minutes per day is all it takes the reap the benefits. Trust us, your body will thank you.
Ready to roll? Here’s how:


Sometimes the hardest part of the work out is taking the extra twenty minutes to cool down and stretch! Sometimes after a really hard work out (or even a not so hard work out) all we want to do is escape the gym, take a cold shower, and go on with our day. But STOP! Stretching and post-work out care is just as important as the actual exercises, and it benefits your joints, muscles and reduces soreness.
Stretching
Obviously, we all need to dedicate more time to stretching. After strength training or cardio, your muscles are warmed so they’re elastic and pliable. Stretching relaxes the tension exerted from the work out, and while it may not correlate to decreased injuries, it has been shown to decrease next-day soreness in hamstrings, quads and calves. Stretching also induces circulation which accelerates the healing process. Be sure to dedicate at least ten minutes to stretching and hit all major muscle groups that you just previously worked.

Drinking lots of water also helps decrease muscle soreness and increase strength and flexibility. If you weigh yourself before and after a workout, this is the water weight you lost and should be a minimum of water you need to drink to replenish. I follow a more simple method, which is just trying to drink my body weight in ounces of water. Keeping hydrated also curves your appetite, because sometimes your stomach tricks you into think it’s hungry when really you’re only thirsty. Check out Health’s 15 Benefits of Drinking Water.
Rollers and Massages
Ever see those big foam rollers lying around at the gym? There’s actually a use for them. Rolling your muscles out after intense work outs reduce swelling and muscle damage, as well as break up knots. Also, foam rolling helps reduce cellulite, which is just fibrous connective bands pulling fat up to the surface. By creating friction and pressure, the foam roller loosens the bands temporarily and helps stimulate circulation and excess fluids, making the skin appear smoother. If you’re conserving money and do not want to spend upwards of $100 on a massage, investing in a foam roller is definitely the price efficient option. GW HellWell has them near the blue mats, or you can purchase your own for as low as $15 on Amazon.
Once you’re done taking that extra 15-20 minutes to take care of your body, you’re free to go on with your day feeling even better than if you had skipped that cool down!


There's no shortage of delicious, healthy, OMG-I-need-to-make-that-right-now smoothie recipes on the internet (this site included). But when you're rushing off to the gym at 6 a.m. or recovering from an insane workout and barely have enough energy to press the "pulse" button on your blender, sometimes it's just easier to freestyle. You know—nix the measuring cups, open the fridge and freezer, and toss whatever's there into that plastic pitcher. But apparently there is an art to healthy haphazardry. This handy chart from activewear aficionado Lorna Jane Clarkson's new book Inspired (get it July 9 at LornaJane.com) shows you how to build a pre- or post-workout smoothie from the ground (er, blades) up.

And now for a delicious example…
Salted Caramel Post-Workout Smoothie

Prep time: 15 minutes
Makes 2 (about 5 cups)
2 c almond milk
1½ medium bananas
2 Tbsp cashew spread (or small handful of raw cashews)
1 scoop natural whey or pea protein powder (optional)
4 pitted Medjool dates
2 tsp honey
½ tsp Himalayan rock salt
2 c ice
2 Tbsp honey, extra
2 Tbsp crushed ice, extra
1 Tbsp cacao nibs
Directions:
Combine all ingredients except extra honey and extra ice in a blender. Drizzle the extra honey around each glass. Pour smoothie in glasses, top with extra ice and cacao nibs to serve.

A luxe stretch-knit cotton jumpsuit with ergonomic seaming and a generous hood is just the thing for slipping on post-workout or pre-binge watch. Style Name: Ivy Park Hooded Jogger Jumpsuit. Style Number: 5516924. Available in stores.

17 Home Remedies to Get Rid of Double Chin Fast https://goo.gl/TEKYYa #DoubleChin #GetRidOfDoubleChin
Get fit and strong with my HIIT Full Body Workout!
A sincere thank you to Kellogg’s Special K for sponsoring this HIIT Full Body workout and refueling tips. As always I only write about products I think you will like and all opinions are my own. Thank you for supporting posts like this that allow me to publish Running in a Skirt for free daily.

Hello! Hello!
After taking some time off of more intense workouts around the holidays, I have been all about returning to some serious sweat sessions this past month. It is so soul cleansing to get in a really good sweaty workout. If you workout regularly I’m sure you feel the same way. If you are still striving to jump on the bandwagon, let me encourage you to just give it a try. It will be hard, but I really believe you’ll end up finding joy in the process and start feeling so much better about yourself and life in general.
This is cliche but true… you NEVER regret a workout.
Of course my first and true workout love is running, but I also try to mix it up with some circuit workouts like this HIIT Full Body Workout. If you aren’t familiar with the term HIIT, it means high intensity interval training. It’s where you do several repetitions of a high intensity activity followed by a short period of rest. So in this workout you do 45 seconds of full on, give it your all moves and then rest for 15 seconds. For beginners you can literally rest during that 15 seconds. If you are more advanced keep moving during those rest periods by walking or jogging in place but you want to allow your heart rate to come back down some.


2017 Copyright. All Rights Reserved.
The Sponsored Listings displayed above are served automatically by a third party. Neither the service provider nor the domain owner maintain any relationship with the advertisers. In case of trademark issues please contact the domain owner directly (contact information can be found in whois).
Wouldn't it be nice to end every active week with an intense deep-tissue massage to help ease your muscles? But since we can't always spring for a trip to the spa, here's what we can do — use the foam roll at the gym.

You may have seen people in the gym foam rolling and think it's just for serious athletes or gym rats, but that's not the case. But there are many reasons why massaging out the tight knots in muscles is an important part of your workout routine, even if you already stretch regularly. Why? Because no matter how much you stretch, the build up of fascia that creates muscle knots that won't go away, which can lead to many different problems.
I've been consistently seeing my trainer for a few weeks, and the aftermath is clear: not only am I working new sets of muscles (meaning new ways of being sore) but I'm also realizing how much more I need to be foam rolling. My trainer, Tim Rich at Crunch Gym, says that everyone, avid athlete or not, should be using those long spongy cylinders daily. Read on for why and how you should be foam rolling every day.
The more regularly you use a foam roll on your tight muscles, the less painful it'll be. Ready to roll? Here are five important stretches you should be doing with a foam roll, and a video on how to foam roll your quads and IT band for elongated, flexible, and injury-free thighs and happy knees.

| After a hard workout, you've probably used up all or a lot of your body's stored carbohydrates. To replenish them quickly, so that your body can recover in time for your next workout, it's important to enjoy a recovery snack within 30 minutes of your workout. Your ideal recovery snack should contain 1/2 gram of carbohydrates per pound of your body weight, and at least 10 grams of protein. A few great recovery snacks:
|
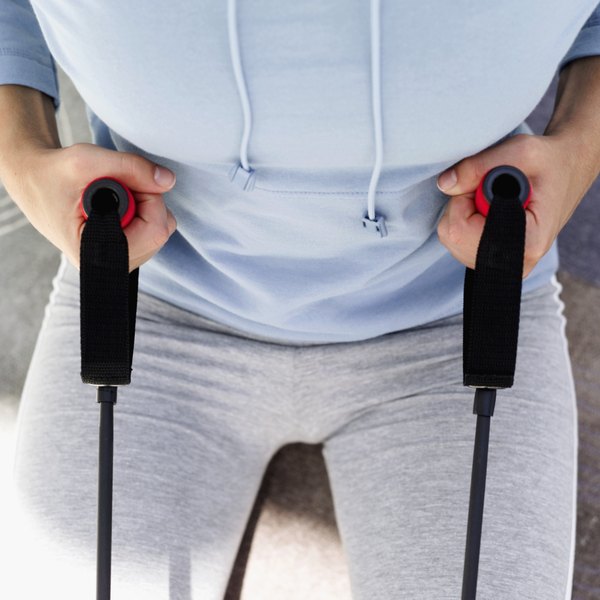
Resistance bands -- known for their effectiveness, affordability and versatility -- are a fantastic tool for boosting strength in your buttocks and hips. Whether you're working out in the gym, at home or on the road, band use is a perfect complement to your glute training program. For safety purposes, use a band based on your current fitness level and check the band for tears before using it. Round off your routine with a glute stretch to reduce post-workout soreness.
To perform this exercise, stand 2 to 3 feet from a wall. Place your hands on the wall for support after looping the band around your thighs and tying the ends of the band together. Position the band just above your knees and stand with your feet comfortably set apart. Straighten your back, align your head over your spine and engage your abdominal muscles as you extend your right leg behind you. Hinge your torso forward slightly and lift your right leg upward against the band’s resistance. Raise the leg as far as possible without arching your lower back. Your left knee should remain slightly bent. Lower the right leg to its initial position, and then repeat the leg lift 10 to 15 times before switching to the left leg. For greater resistance, position the band around your ankles.
Intensify the outcome of traditional squats by working with a band. Grasp one end of the band in each hand and stand with your feet shoulder-width apart on top of the middle portion of the band. Straighten your back, engage your abdominal muscles and direct your toes forward. Draw your hands up to your hips or shoulders, taking care not to arch your lower back. Bend your knees and slowly lower your buttocks into a squat with your knees over your insteps. Maintain a straight spine and allow your glutes to jut backward. Ideally, your thighs will be almost parallel to the floor, but don’t allow your knees to extend beyond your toes. Slowly rise to your initial position, and then repeat, completing 10 to 15 squats. To increase the challenge, add a lateral leg lift after you rise from the squat.
Tie a resistance band around your thighs and lie on your back with your knees bent. Flex your feet and rest your heels on a raised surface, such as an exercise step or low stair. Your feet should be slightly more than hip-width apart. Extend your arms along your sides with your palms pressing into the floor. Open your thighs and knees as much as possible, working against the band’s resistance. Dig your heels into the raised surface as you raise your hips into a “bridge” position with your shoulders on the floor and your neck relaxed. Hold the raised position for 5 seconds, and then slowly release back to the floor. Repeat 10 to 15 times.
With the band tied around your thighs, stand with your feet slightly wider than hip-width apart and your toes directed forward. Clasp your hands together in front of your chest. Tighten your abdominal muscles and sit into a squat with your thighs almost parallel to the floor and your knees over your insteps. Maintain the squat position while stepping to the right with your right foot. Draw your left foot toward your right foot. Repeat the exercise, stepping five times to your right, and then reverse the direction of your shuffle, taking five steps to your left. Keep your shoulders and hips square throughout the exercise.
Judy Fisk has been writing professionally since 2011, specializing in fitness, recreation, culture and the arts. A certified fitness instructor with decades of dance training, she has taught older adults, teens and kids. She has written educational and fundraising material for several non-profit organizations and her work has appeared in numerous major online publications. Fisk holds a Bachelor of Arts in public and international affairs from Princeton University.
MORE MUST-CLICKS:
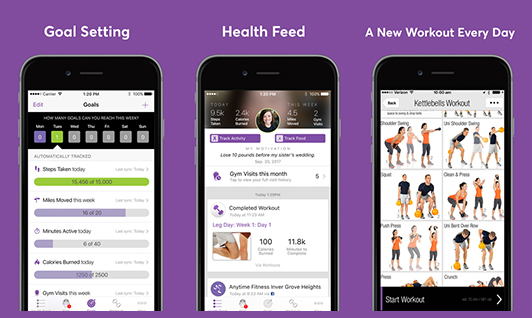
The Anytime Fitness® App helps our members Get to a Healthier Place® by providing easy access to over 1,100 workout plans, goal setting to stay on track and the ability to monitor their progress, both inside and outside the gym.
Available for iOS and Android Devices
Stay motivated and on-track to achieve more.
Over 1,100+ workout plans at your fingertips will keep you challenged and focused.
With a few quick taps, you can update your stats and monitor progress.
©2017 Anytime Fitness, LLC. All Anytime Fitness App features and functionality may not be available to individuals who are not members of a participating Anytime Fitness club. Anytime Fitness clubs are independently owned and operated and participation may vary. See your local club for details.
DAREBEE is a non-profit free, ad-free and product placement free global fitness resource. DAREBEE is supported exclusively via user donations. Disclaimer & Privacy Policy. © 2018 DAREBEE | formerly NeilaRey.com | All Rights Reserved.
This website uses Cookies. All of the materials on this website are unique, copyrighted and are exclusive to darebee.com. Contact DAREBEE administration


We've heard about the importance of proper workout footwear from medical professionals, magazines, friends, family and so many other sources. We get it! Running and walking require specially formulated shoes, while cross-trainers are more appropriate for the gym or a fitness class. But what happens to our feet after exercise?

As it turns out, there are some steps we should all be taking to ensure that our feet remain in tip-top shape after a workout. We asked podiatrist Dr. Jackie Sutera and doctor of physical therapy Brian Hoke, both of the Vionic Innovation Lab, for some insight into post-workout foot recovery. Here are their simple (yet indispensable) tips.
Cooldown stretching–here’s what to do after a workout to salvage your soles:
Address these common post-workout foot issues:

Looking for a pair of post-recovery sandals? Our favorite Vionic Tide flip-flop is a favorite for a reason: The pronounced arch support and deep heel cup provide just the right amount of support and is proven to help alleviate heel pain.* And with over 20 colors and patterns to choose from, you’re sure to find your perfect pair.

About Vionic Footwear
Developed by Phillip Vasyli, renowned Australian podiatrist and founder of Orthaheel® Technology, all Vionic shoes help restore natural foot function and relieve heel pain, promoting a more active lifestyle. Vionic’s footwear and orthotic inserts are also endorsed by noted integrative medicine expert Dr. Andrew Weil. For additional information about Vionic, please visit VionicShoes.com.
*Based on a peer-reviewed clinical study partially funded by Vionic on people experiencing moderate, non-traumatic heel pain.
Get in shape, boost your endurance and reduce your stress levels with this intermediate workout routine for women. A set of 10 bodyweight exercises to strengthen and tighten your whole body and speed up your metabolism!

Start this intermediate workout routine with a full body warm up.
Repeat this circuit 3 times and rest for 60 seconds between sets.
1. Butt kicks: 60 seconds. Start kicking your feet up until the heels touch the glutes, and pump your arms at the same time.
2. Arms cross side lunge: 45 seconds. Do alternating side lunges and cross your arms as you stand up straight.
3. Side plank front kick: 30 seconds + 30 seconds. Start in a side plank position, with your bottom knee bent on the mat and with your top leg extended. Lift your top leg at hip height and kick it slowly to the front, without moving your upper body.
4. Speed bag punches: 45 seconds. Stand up, raise your elbows to shoulder level, keep your feet shoulder-width apart and your knees slightly bent. Shift your weight to one leg and rotate the opposite forearm twice. Switch sides and repeat.
5. Side to side shuffle: 60 seconds. Start in an athletic position, with your knees slightly bent and your hips back. Take a few quick steps to the right and then touch your right foot. Repeat on the left side.
6. Squat kickback: 60 seconds. Squat and, as you stand up, transfer your weight to one leg and kick back with the opposite leg.
7. Side plank hip abduction: 30 seconds + 30 seconds. Start in a modified side plank position, lift your top leg as high as possible and then lower it back down.
8. Inchworm: 45 seconds. Stand straight with your feet shoulder-width apart, bend at the waist and walk your hands out as far as you can. Walk back up and repeat.
9. Scissor skier: 45 seconds. Jump up, bring your right leg forward, your left leg back, and reach your left arm up and your right arm back. Jump again and switch sides.
10. Crab kicks: 45 seconds. Sit on the floor, lift your hips and kick your right leg up. Switch legs, repeat and keep alternating legs until the set is complete.

Stretch your whole body with a thorough 10 minute stretching routine.
Enter your weight to find out how many calories you can burn doing this full body intermediate workout routine:

True to its heritage, the new ASICS Women’s GEL-Kayano 22 Running Shoe takes a bold step forward in unsurpassed performance and modern design!
Like a car, a runner who wants to operate at his most optimum potential needs his particular set of fuels.
He needs the right combination of carbohydrates, proteins and fats to fuel his running.
Each of these food groups has a specific function to fulfill in the body.
Getting the right amount and mix of these important nutrients is the right step towards your success!


The primary fuel for exercising muscles and for high-intensity exercises are carbohydrates.
The athlete’s body needs around 50 to 65% carbohydrates in his food intake to support training.
Lacking enough carbohydrates causes the body to under-perform and cannot burn fat as effectively as it should during workouts.
It should be the staple of your diet before, during and after each exercise, including running intervals throughout the day.
Carbohydrates abound in such food as:
These days, many people make do with easily digestible carbohydrates from sports drinks or gels.
Consult your sports nutritionist for the exact amounts of your carbohydrates requirements.

Proteins are important because they build and repair muscles, ligaments, and tendons – all essentials in becoming a strong athlete.
You can get your proteins from such sources as:
They’re more important after workouts than before or during.
This is because protein helps repair the body itself after strenuous activities like exercises and running!
The more you run (or train as an athlete) the more you need the protein to repair different parts of your body.
Your needs depend on how many hours a week you run, or if you are trying to lose body fat or if you are lifting weights!

The last food group, fat, helps sustain prolonged exercises at lower intensities.
Our bodies have enough stored fat to fuel our exercise over an extended period of time.
However, fat is difficult to use for quick energy!
This is why carbohydrates are the choice fuel during most exercises.
Athletes need about 20 to 30% of calories from fats.
Healthy sources of fats include:
Unfortunately, most people get too much fat in their diets.
What is worse is that too much of these fat come from unhealthy fats (saturated and trans-fats from sausages, burgers, French fries, donuts, sweets and many more)!

For an athlete, achieving the right balance of these three all-important food groups is the first step to fulfilling your potential.
Your day-to-day diet has to be adjusted accordingly to support your kind of training.
Since everyone is different from the next person, it is important that your diet is suited to your exact personal body needs.
You can only get these exact data from a nutrition professional how can develop and plan a personalized nutrition plan for you.
Remember, running (especially competitive running) can be as strenuous as any other energy use-intensive sports! Your body fuel should not be taken lightly!
A taste so unbelievable, you’ll think you’re eating the real thing! America’s Favorite Protein Bar: Quest Nutrition Protein Bar.


Nancy
I didn't make official before pictures because I was already thin and worked out a lot and didn't think my body would change that much, but I was really wrong!!
I've always been bottom heavy and have focused on working those areas, working out consistently for about 5 years doing 5 days a week of 3 days of 2 mile runs, one day yoga/Pilates, and one day of weights.
The full body pic on the left is what I've looked like for as long as I can remember with my typical workout routine, but the full body pic on the right is after the get fit guide
really amazing! And with the left pic, I'm sucking in haha but in the right (now), I'm just existing! My body is so much more balanced now. I can't believe it!
Amy
First off, I want to say that your workouts are absolutely amazing. I have lost countless inches, 80 pounds, and gained a ton of confidence since I started your workouts a year ago.
I started with the month long HIIT guide, then went to the first Get Fit Guide, and then I did the updated GFG when it came out.
I have done the updated guide twice, and I'm in the middle of doing the very first GFG again for the second time.
I can't thank you enough for coming up with amazing workouts that have helped me in my fitness journey.
Mallory
Brittani
At six months postpartum I was ready to be me again. I didn’t have much time with a baby needing me what seemed like every moment of the day and getting to the gym sounded impossible.
I found the Sugary SixPack Get Fit Guides and was definitely skeptical that a 30-minute a day program could work. In the past, I’ve spent hours in the gym climbing the Stairmaster of death and lifting weights to get results.
So I started the guides figuring something was better than nothing. I planned to eat healthy 80% percent of the time and didn’t restrict myself if I really wanted something.
If I had birthday cake or breadsticks, I made sure to eat low carb for the next meal.After the first month I felt so much stronger and was starting to see results. I just finished the 12-week program and feel confident and happy with my changes.
I can get a quick exercise in during my little guy’s nap and have never had my legs and abs look better. I’m actually seeing some ab definition and am starting round two to continue to tone.
